Difference between revisions of "Mining Transport"
(→Anti Ship Defences) |
m |
||
| (15 intermediate revisions by 5 users not shown) | |||
| Line 1: | Line 1: | ||
{{CargoShipinfobox | {{CargoShipinfobox | ||
| name = Mining Transport | | name = Mining Transport | ||
| − | | image = | + | | image = CargoShip_MiningTransport_Full.jpg |
| class = Mining | | class = Mining | ||
| − | | mass = | + | | mass = 401953 |
| + | | speed = 17 | ||
| boobytrap = no | | boobytrap = no | ||
| − | | | + | | directfireweapons = none |
| − | | | + | | exteriordefense = 2x [[Gatling Turret]]s |
| − | | | + | | interiordefense = 1x [[Interior Turret]] |
| shipsize = large | | shipsize = large | ||
| − | | version = 01. | + | | version = 01.030.008 - |
}} | }} | ||
Mining transport [[Cargo Ships|cargo ship]] with 2 [[Large Cargo Container|large cargo containers]] | Mining transport [[Cargo Ships|cargo ship]] with 2 [[Large Cargo Container|large cargo containers]] | ||
| − | [[ | + | == Defenses == |
| + | === Exterior Defenses === | ||
| + | There are 2 [[Gatling Turret|Gatling turrets]] on either side of the ship | ||
| − | == | + | === Interior Defenses === |
| − | + | There is one [[Interior Turret|interior turret]] visible upon entry through the exterior door. | |
| − | There | + | |
| + | == Drones == | ||
| − | + | The specific [[antenna]] that spawns [[drone|drones]] has a range of 300 meters and is named: "EMERGENCY - REQUESTING ASSISTANCE". This antenna within range will spawn a [[Assailant_mk.1|Assailant]] drone in defense, at 3000 meters away from the player and every 5 minutes up to a total number of 3 drones active any time. | |
| − | |||
== Tactics == | == Tactics == | ||
=== Approach === | === Approach === | ||
| − | The most cover from the [[Gatling Turret|Gatling | + | The most cover from the [[Gatling Turret|Gatling turrets]] can be achieved by approaching from the top of the ship, and slightly forward. (i.e., toward the spotlights with the beacon directly behind) |
| − | ( | ||
=== Attack === | === Attack === | ||
| − | You may not need to attack at all, but if you do, try attacking the [[Gatling Turret]] on the ship's right hand side | + | You may not need to attack at all, but if you do, try attacking the [[Gatling Turret|Gatling turret]] on the ship's right hand side; the [[Gravity Generator|gravity generator]] is on the ship's left, and attacking from the left may result in its destruction. |
| − | |||
=== Entry === | === Entry === | ||
| Line 40: | Line 41: | ||
Orientation: the floor plan's south (or down) is the ship's forward direction.<br/> | Orientation: the floor plan's south (or down) is the ship's forward direction.<br/> | ||
The outer door is at the front of the ship, which is shown on the bottom of the floor plan. <br/> | The outer door is at the front of the ship, which is shown on the bottom of the floor plan. <br/> | ||
| − | The [[Beacon]], located at the rear of the ship can be seen at the top of the floor plan. | + | The [[Beacon|beacon]], located at the rear of the ship can be seen at the top of the floor plan. |
| − | + | ==== Direct way ==== | |
| − | Upon entry from the exterior [[Door]], you'll be confronted with an [[Interior Turret]], to the left of the turret, there is an interior [[Door]] that leads directly to a room with the [[Cockpit]], and no further defences. | + | Upon entry from the exterior [[Door|door]], you'll be confronted with an [[Interior Turret|interior turret]], to the left of the turret, there is an interior [[Door|door]] that leads directly to a room with the [[Cockpit 2|cockpit]], and no further defences. |
| + | |||
| + | ==== Smart way ==== | ||
| + | Directly behind the [[Beacon|beacon]] there is a [[Steel Catwalk|steel catwalk]] that can be easily dismantled to gain direct access to the ship's cockpit. | ||
| − | |||
| − | |||
</div> | </div> | ||
| + | == Salvage == | ||
| + | === Cargo containers === | ||
| + | Each of the two [[Large Cargo Container|large cargo containers]] can easily be raided.<br/> | ||
| + | Cargo found so far: (the actual Cargo contends may vary) | ||
| + | * [[25x184mm_NATO_Ammo_Container|25x184mm ammo containers]] | ||
| − | === | + | === Refinery === |
| − | + | The refineries are also connected to the conveyor system. <br/> | |
| − | + | Cargo found so far: (the actual Cargo contends may vary) | |
| − | + | * [[Uranium Ore]] | |
| + | * [[Platinum Ore]] | ||
| + | * [[Magnesium Ore]] | ||
| + | * [[Silicon Ore]] | ||
| − | + | === Reactors === | |
| − | There are | + | There are two [[Small_Reactor|small reactors]] outside of the ship. <br/> |
| + | Cargo summary: | ||
| + | * 21kg [[Uranium Ingot|Uranium]] | ||
| + | Amounts may vary due fuel consumption | ||
== Ship Composition: == | == Ship Composition: == | ||
| − | + | === Thrusters & gyros === | |
| − | * | + | * 2x [[Large_Thruster|Large thrusters]] |
| − | * | + | * 14x [[Small_Thruster|Small thrusters]] + 1x incomplete |
| − | * | + | * 3x [[Gyroscope|Gyroscopes]] + 1x incomplete |
| + | |||
| + | === Reactors === | ||
| + | * 2 x [[Small_Reactor|Small reactors]] | ||
| + | |||
| + | === Cargo System === | ||
| + | * 2x [[Large Cargo Container|large cargo containers]] | ||
| + | * 2x [[Connector]] | ||
| + | |||
| + | === Miscellaneous === | ||
| + | * 1x [[Beacon]] | ||
| + | * 2x [[Door|Doors]] | ||
| + | * 2x [[Landing Gear|Landing gears]] | ||
| + | * 1x [[Gravity Generator|Gravity generator]] | ||
| + | * 1x [[Ore Detector]] incomplete | ||
| + | * 1x [[Refinery]] + 1x incomplete | ||
| + | * 2x [[Spotlight|Spotlights]] | ||
| + | |||
| + | == Changes: == | ||
| + | As of [[Update_01.030.008|v.1.030]] ([[Change_Log|list]]), the new Mining Transport has gained 2 [[Connector|connectors]] and the [[Conveyor|Conveyor system]] is improved. The [[Small_Reactor|small reactors]] are now located outside of the ship. The [[Cockpit|cockpit]] has changed from [[Cockpit 2|type 2]] to [[Cockpit 3|type 3]] and the viewing port above it is now made out of [[Window 1x1 Slope|glass]] instead of a [[Window|steel shutter]]. | ||
| − | + | ==See Also== | |
| − | * | + | * [[Cargo Ships]] |
| + | * [[Mining Carriage]] | ||
| + | * [[Mining Hauler]] | ||
| − | + | [[Category: Cargo Ships]] | |
| − | + | [[Category: Mining Ships]] | |
| − | |||
| − | |||
| − | |||
| − | |||
| − | |||
Latest revision as of 08:45, 11 November 2015
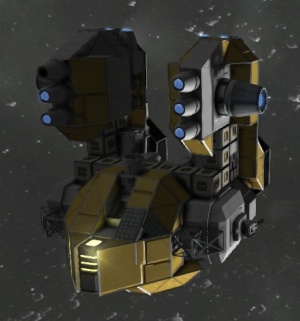
Mining transport cargo ship with 2 large cargo containers
Defenses
Exterior Defenses
There are 2 Gatling turrets on either side of the ship
Interior Defenses
There is one interior turret visible upon entry through the exterior door.
Drones
The specific antenna that spawns drones has a range of 300 meters and is named: "EMERGENCY - REQUESTING ASSISTANCE". This antenna within range will spawn a Assailant drone in defense, at 3000 meters away from the player and every 5 minutes up to a total number of 3 drones active any time.
Tactics
Approach
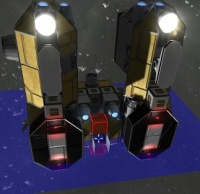
The most cover from the Gatling turrets can be achieved by approaching from the top of the ship, and slightly forward. (i.e., toward the spotlights with the beacon directly behind)
Attack
You may not need to attack at all, but if you do, try attacking the Gatling turret on the ship's right hand side; the gravity generator is on the ship's left, and attacking from the left may result in its destruction.
Entry
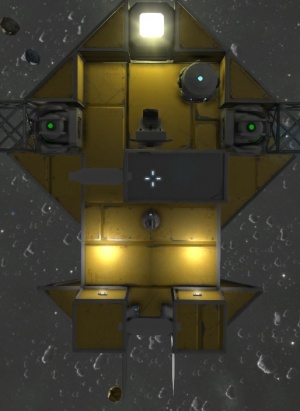
There are 2 ways to enter this ship, these can be seen on the floorplan below
Orientation: the floor plan's south (or down) is the ship's forward direction.
The outer door is at the front of the ship, which is shown on the bottom of the floor plan.
The beacon, located at the rear of the ship can be seen at the top of the floor plan.
Direct way
Upon entry from the exterior door, you'll be confronted with an interior turret, to the left of the turret, there is an interior door that leads directly to a room with the cockpit, and no further defences.
Smart way
Directly behind the beacon there is a steel catwalk that can be easily dismantled to gain direct access to the ship's cockpit.
Salvage
Cargo containers
Each of the two large cargo containers can easily be raided.
Cargo found so far: (the actual Cargo contends may vary)
Refinery
The refineries are also connected to the conveyor system.
Cargo found so far: (the actual Cargo contends may vary)
Reactors
There are two small reactors outside of the ship.
Cargo summary:
- 21kg Uranium
Amounts may vary due fuel consumption
Ship Composition:
Thrusters & gyros
- 2x Large thrusters
- 14x Small thrusters + 1x incomplete
- 3x Gyroscopes + 1x incomplete
Reactors
- 2 x Small reactors
Cargo System
Miscellaneous
- 1x Beacon
- 2x Doors
- 2x Landing gears
- 1x Gravity generator
- 1x Ore Detector incomplete
- 1x Refinery + 1x incomplete
- 2x Spotlights
Changes:
As of v.1.030 (list), the new Mining Transport has gained 2 connectors and the Conveyor system is improved. The small reactors are now located outside of the ship. The cockpit has changed from type 2 to type 3 and the viewing port above it is now made out of glass instead of a steel shutter.


