Difference between revisions of "Assembler/zh"
(Created page with "{{DISPLAYTITLE:装配机}} {{itembox | item = Assembler | description = 构建为建造大型和小型舰船方块所需的组件。 | translation = 装配机 | tool = no | la...") |
|||
| Line 23: | Line 23: | ||
| lcomponent4 = Motor | | lcomponent4 = Motor | ||
| lcomponent4amt = 8 | | lcomponent4amt = 8 | ||
| − | | lcomponent5 = | + | | lcomponent5 = Construction Component |
| − | | lcomponent5amt = | + | | lcomponent5amt = 40 |
| − | | lcomponent6 = | + | | lcomponent6 = Steel Plate |
| − | | lcomponent6amt = | + | | lcomponent6amt = 130 |
| − | | | + | | lwidth = 1 |
| − | | | + | | lheight = 1 |
| + | | ldepth = 2 | ||
| + | | lstoragecapacity = (仅[[material/zh|矿锭]]与[[Component/zh|元件]]) 4000 | ||
| version = 01.022.013 | | version = 01.022.013 | ||
| Line 37: | Line 39: | ||
装配机的功能是使用精炼出的锭制造[[Components and Tools/zh|组件]]。他同样可以切换到拆卸模式,它将摧毁组件回收锭以供使用。 | 装配机的功能是使用精炼出的锭制造[[Components and Tools/zh|组件]]。他同样可以切换到拆卸模式,它将摧毁组件回收锭以供使用。 | ||
| + | The Assembler's function is to create [[Components]], using refined ingots. It can also be switched to a disassemble mode, where it will destroy components to reclaim the ingots used. The Assembler is one of the most important blocks in Space Engineers. Alongside the [[Refinery]] and the [[Medical Room]] (and, arguably, a [[Reactor]] to power them), it is one of the essential parts of a successful [[Survival Mode]] game. | ||
| − | == | + | == Usage == |
| + | === Control Panel === | ||
| + | {| class="wikitable" ; style="width: 20% | ||
| + | !colspan="2" style="font-size:16px;"| [[Control Interface|Control Interface Menu]] | ||
| + | |- | ||
| + | !style="text-align:center ; font-size:14px;"| Options | ||
| + | !style="text-align:center ; font-size:14px;"| Comments | ||
| + | |- | ||
| + | !style="text-align:left;" | Toggle block | ||
| + | |Turns the device on, or off. | ||
| + | |- | ||
| + | !style="text-align:left;" | Name | ||
| + | |You can enter in your own custom name in the text box | ||
| + | |- | ||
| + | !style="text-align:left;" | Show on HUD | ||
| + | |If there is an [[Antenna]] attached to the same grid, this device will display its position on the players HUD | ||
| + | |- | ||
| + | !style="text-align:left;" | Use Conveyor System | ||
| + | |If "on" allows the assembler to automatically draw items from other inventories connected to it | ||
| + | |} | ||
| − | Before telling the assembler to make anything, you first need to ensure that the required materials are available. The items required can be supplied to the assembler in two main ways; you can either place them into it manually, or you can connect it to another block which contains the required materials (a refinery, for example) using the [[Conveyor]] system and it will automatically pull through the materials as required. | + | == Usage == |
| + | |||
| + | Before telling the assembler to make anything, you first need to ensure that the required materials are available. The items required can be supplied to the assembler in two main ways; you can either place them into it manually, or you can connect it to another block which contains the required materials (a refinery, for example) using the [[Conveyor]] system and it will automatically pull through the materials as required. | ||
| + | === Quick Guide === | ||
Giving instructions to the assembler is done via the "Production" tab of the Control Panel. When in the Production view, there are 6 main areas to look at: the assembler select, component selection, cost display, mode buttons, build queue and component inventory. | Giving instructions to the assembler is done via the "Production" tab of the Control Panel. When in the Production view, there are 6 main areas to look at: the assembler select, component selection, cost display, mode buttons, build queue and component inventory. | ||
| + | [[File:Assembler02.jpg|none|thumb|300px|Assembler Menu]] | ||
| + | |||
| + | ==== Assembler Select ==== | ||
| + | This is the drop-down box in the very top-left of the Production panel. This box lists all of the assemblers attached to the ship/station you are interacting with; if the ship/station has multiple assemblers, this is where you would switch between them to give each of them different orders. [[File:Assembler03.jpg|none|frame]] | ||
| + | |||
| + | ==== Blueprint Select ==== | ||
| + | This is the area below the assembler select, where you will see icons for various components that can be built. There are also 4 buttons at the top of this area, which switch between showing large ship blocks, small ship blocks, tools and components, respectively. If you click one of the components or tools, they will be added to the build queue. If you click one of the ship blocks, the components required to build that block will be added to the build queue. [[File:Assembler04.jpg|none|thumb|100px]] | ||
| + | |||
| + | ==== Store Materials ==== | ||
| + | This is the large area in the centre of the panel, otherwise known as where the cost of materials is displayed. This will show the amount of ingots required for the current build queue, or for 1 of anything you mouse over. If there are not enough ingots in the assembler, the number will appear in red. | ||
| + | ;Note | ||
| + | :*The assembler only counts items that are currently in the assembler inventory; if you have the assembler connected to another block with conveyors, it will not count any materials outside of its own inventory. Items that show in red are materials required that are not in the assembler itself, but if connected to a conveyor network, it will pull the required amount once production begins. | ||
| + | [[File:Assembler06.jpg|none|thumb|100px]] | ||
| + | |||
| + | ==== Assembler Modes ==== | ||
| + | [[File:Assembler07.jpg|none|frame]] | ||
| + | *Assembling | ||
| + | Selecting this option allows for the creation of components and tools | ||
| + | *Disassembling | ||
| + | When selected, it will disassemble components that are inside its inventory back to the ingots that were used to make it (Example: Steel plate = 22 iron ingots). | ||
| + | ;Note | ||
| + | :*In disassemble mode, the component selection menu will be disabled. | ||
| + | ==== Production Queue ==== | ||
| + | This is the area just below the mode buttons. In this area, the items that the assembler has been ordered to (dis)assemble will be shown. They are processed from left-to-right, top-to-bottom. There is also another button on the top-right of this area; this button toggles repeat mode. When in repeat mode, 2 looping arrows appear in this button to show that it is turned on, and the assembler will do one of two things: | ||
| + | :#If in assemble mode, it will repeat the current build queue, looping back to the start upon completing it. | ||
| + | :#If in disassemble mode, it will automatically disassemble any and all components placed in its inventory. | ||
| + | [[File:Assembler08.jpg|none|thumb|200px]] | ||
| + | |||
| + | ==== Component Inventory ==== | ||
| + | This will display any components that are in the assembler's inventory. If it is in disassemble mode, you can click on the items here to add them to the build queue to be disassembled. As the Assembler gains more items, the inventory will increse no matter how much ingots/ other itmes you have in it, similar the the player inventory. | ||
| + | [[File:Assembler09.jpg|none|thumb|200px|Assembler Menu]] | ||
| + | |||
| + | |||
| + | === Upgrade Modules === | ||
| + | |||
| + | ''Information is current for v1.089'' | ||
| + | |||
| + | There are two types of upgrade module for Assemblers: | ||
| + | |||
| + | * Power Efficiency modules decrease the Assembler's power consumption. | ||
| + | * Productivity modules increase the speed at which components are produced. | ||
| + | |||
| + | An Assembler starts with '100%' in all categories. When you add modules, the Assembler's Control Panel will show the adjusted percentages. | ||
| + | |||
| + | The Assembler block itself has six attachment points for modules. Each module can occupy up to two attachment points. | ||
| + | |||
| + | Productivity modules add 50% to the Productivity stat for each attachment point occupied, giving a maximum of 400% achievable with 4 modules filling all points (two of the points are not adjacent and will require separate modules). This yields 4 times the production speed for the standard Assembler, but new types of factory added to the game later may behave differently. Productivity gains are added to the 'assembly speed' of the factory at a rate of 0.5 per attachment point, so the actual speed can be calculated as: | ||
| + | |||
| + | p = number of Productivity attachment points (0 to 6) | ||
| + | Productivity shown in control panel = 100% + (p*50%) | ||
| + | base speed = b | ||
| + | actual production speed = b + (p/2) | ||
| + | |||
| + | The Assembler's base speed of 1 means that the displayed productivity is accurate. | ||
| + | |||
| + | == Media == | ||
| + | [[File:Assembler01.jpg|none|thumb|340px|Assembler]] | ||
| + | |||
| + | == Tips == | ||
| − | === | + | == Known Issues == |
| − | |||
| − | == | + | == Related Items == |
| − | + | *[[Efficiency Upgrade Module/zh|效率升级模组]] | |
| + | *[[Power Efficiency Upgrade Module/zh|能量利用率升级模组]] | ||
| − | == | + | == Programming == |
| − | + | (IMyAssembler)<br> | |
| + | Actions: 4 (see also Function above) | ||
| + | Toggle block On/Off | ||
| + | Toggle block On | ||
| + | Toggle block Off | ||
| + | Use Conveyor System On/Off | ||
| − | + | Properties: 0 | |
| − | |||
| − | = | + | <div style="-webkit-border-image: none;-webkit-box-shadow: rgba(0, 0, 0, 0.046875) 0px 1px 1px 0px inset;background-color: #eeeeee;border-bottom-color: #AFAFAF;border-bottom-left-radius: 3px;border-bottom-right-radius: 3px;border-bottom-style: solid;border-bottom-width: 1px;border-left-color: #AFAFAF;border-left-style: solid;border-left-width: 1px;border-right-color: #AFAFAF;border-right-style: solid;border-right-width: 1px;border-top-color: #AFAFAF;border-top-left-radius: 3px;border-top-right-radius: 3px;border-top-style: solid;border-top-width: 1px;box-shadow: rgba(0, 0, 0, 0.046875) 0px 1px 1px 0px inset;color: #333;display: block;font-family: 'Helvetica Neue', Helvetica, Arial, sans-serif;font-size: 1em;height: auto;line-height: 20px;margin-bottom: 5px;margin-left: 8px;margin-right: 8px;margin-top: 0px;min-height: 20px;padding-bottom: 4px;padding-left: 4px;padding-right: 4px;padding-top: 4px;width: auto;"> |
| − | + | {| class="wikitable" style="width: 100%" | |
| + | |style="text-align: center;width: 8%"| N/A ||style="padding-left: 10px;padding-right: 10px;"| N/A | ||
| + | |} | ||
| − | + | </div> | |
| − | + | [[Category:Production Blocks]] | |
Revision as of 03:47, 1 December 2015
装配机是太空工程师中的重要方块。同精炼厂与医疗室一样(显然还需要反应堆能源驱动他们),是一个成功的生存模式游戏的重要部分之一。
Contents
功能
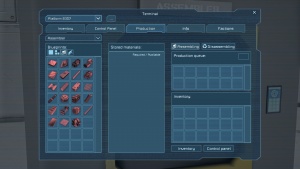
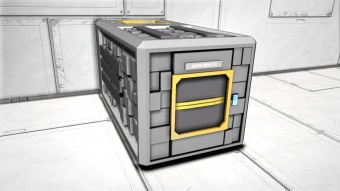
装配机的功能是使用精炼出的锭制造组件。他同样可以切换到拆卸模式,它将摧毁组件回收锭以供使用。 The Assembler's function is to create Components, using refined ingots. It can also be switched to a disassemble mode, where it will destroy components to reclaim the ingots used. The Assembler is one of the most important blocks in Space Engineers. Alongside the Refinery and the Medical Room (and, arguably, a Reactor to power them), it is one of the essential parts of a successful Survival Mode game.
Usage
Control Panel
| Control Interface Menu | |
|---|---|
| Options | Comments |
| Toggle block | Turns the device on, or off. |
| Name | You can enter in your own custom name in the text box |
| Show on HUD | If there is an Antenna attached to the same grid, this device will display its position on the players HUD |
| Use Conveyor System | If "on" allows the assembler to automatically draw items from other inventories connected to it |
Usage
Before telling the assembler to make anything, you first need to ensure that the required materials are available. The items required can be supplied to the assembler in two main ways; you can either place them into it manually, or you can connect it to another block which contains the required materials (a refinery, for example) using the Conveyor system and it will automatically pull through the materials as required.
Quick Guide
Giving instructions to the assembler is done via the "Production" tab of the Control Panel. When in the Production view, there are 6 main areas to look at: the assembler select, component selection, cost display, mode buttons, build queue and component inventory.
Assembler Select
This is the drop-down box in the very top-left of the Production panel. This box lists all of the assemblers attached to the ship/station you are interacting with; if the ship/station has multiple assemblers, this is where you would switch between them to give each of them different orders.Blueprint Select
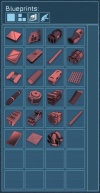
This is the area below the assembler select, where you will see icons for various components that can be built. There are also 4 buttons at the top of this area, which switch between showing large ship blocks, small ship blocks, tools and components, respectively. If you click one of the components or tools, they will be added to the build queue. If you click one of the ship blocks, the components required to build that block will be added to the build queue.Store Materials
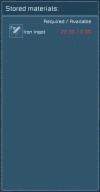
This is the large area in the centre of the panel, otherwise known as where the cost of materials is displayed. This will show the amount of ingots required for the current build queue, or for 1 of anything you mouse over. If there are not enough ingots in the assembler, the number will appear in red.
- Note
- The assembler only counts items that are currently in the assembler inventory; if you have the assembler connected to another block with conveyors, it will not count any materials outside of its own inventory. Items that show in red are materials required that are not in the assembler itself, but if connected to a conveyor network, it will pull the required amount once production begins.
Assembler Modes
- Assembling
Selecting this option allows for the creation of components and tools
- Disassembling
When selected, it will disassemble components that are inside its inventory back to the ingots that were used to make it (Example: Steel plate = 22 iron ingots).
- Note
- In disassemble mode, the component selection menu will be disabled.
Production Queue
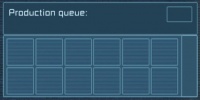
This is the area just below the mode buttons. In this area, the items that the assembler has been ordered to (dis)assemble will be shown. They are processed from left-to-right, top-to-bottom. There is also another button on the top-right of this area; this button toggles repeat mode. When in repeat mode, 2 looping arrows appear in this button to show that it is turned on, and the assembler will do one of two things:
- If in assemble mode, it will repeat the current build queue, looping back to the start upon completing it.
- If in disassemble mode, it will automatically disassemble any and all components placed in its inventory.
Component Inventory
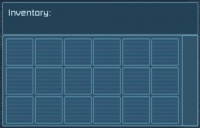
This will display any components that are in the assembler's inventory. If it is in disassemble mode, you can click on the items here to add them to the build queue to be disassembled. As the Assembler gains more items, the inventory will increse no matter how much ingots/ other itmes you have in it, similar the the player inventory.
Upgrade Modules
Information is current for v1.089
There are two types of upgrade module for Assemblers:
- Power Efficiency modules decrease the Assembler's power consumption.
- Productivity modules increase the speed at which components are produced.
An Assembler starts with '100%' in all categories. When you add modules, the Assembler's Control Panel will show the adjusted percentages.
The Assembler block itself has six attachment points for modules. Each module can occupy up to two attachment points.
Productivity modules add 50% to the Productivity stat for each attachment point occupied, giving a maximum of 400% achievable with 4 modules filling all points (two of the points are not adjacent and will require separate modules). This yields 4 times the production speed for the standard Assembler, but new types of factory added to the game later may behave differently. Productivity gains are added to the 'assembly speed' of the factory at a rate of 0.5 per attachment point, so the actual speed can be calculated as:
p = number of Productivity attachment points (0 to 6)
Productivity shown in control panel = 100% + (p*50%)
base speed = b
actual production speed = b + (p/2)
The Assembler's base speed of 1 means that the displayed productivity is accurate.
Media
Tips
Known Issues
Related Items
Programming
(IMyAssembler)
Actions: 4 (see also Function above)
Toggle block On/Off
Toggle block On
Toggle block Off
Use Conveyor System On/Off
Properties: 0
| N/A | N/A |
