Dedicated Servers
Dedicated servers in Space Engineers allow players to connect to a third party host, rather than using a player-host, in a peer-to-peer set-up. They are game instances intended for long time multiplayer games. They don’t depend on any player and they run without render and visual/audio effects. This will result to a faster connection and a more fluent multiplayer performance with less lag.
Dedicated servers are available for everyone who own Space Engineers. You don’t need an extra Steam account, you get Space engineers dedicated server for free to your existing Space Engineers account.
Notes:
- Dedicated servers are currently allowed only for non-commercial use, so companies that host game servers or everyone who wants to host his server at such company will not be able to do so (this will be available very soon).
- In order to run a dedicated server, players don't require a licensed copy of the game. However to legally obtain the game server files, at least one Steam account needs to have a valid license.
Dedicated Servers sub-forum
Contents
Dedicated Server Guide
Requirements
- Windows PC (if you want to run the server as a "service" you need to use administration account)
- .NET redistributable (version 4 or higher)
- Static IP address, if you intend to host the game publicly, so that anyone from the Internet can connect to it
Installation
On PC With Steam:
   The Dedicated server is installed along with SE
   Right-click on the game in your Steam library
   Select “Properties” and under the tab “Local Files”
   Click “Browse Local Files…”)
   Open folder "DedicatedServer(64)"
   In this folder you with find the server's executable
On PC Without Steam:
   Go to "C:\Program Files(x86)\Steam\SteamApps\SpaceEngineers\Tools"
   Extract the archive on the target machine
   Make sure Microsoft .NET Framework 4 is installed
   You should be ready to run the server
Quick Server Setup
Basic setup as a foreground process:
  Run SpaceEngineersDedicated.exe
  Choose “Local/Console” item in list of servers
  Click “Continue to server configuration”
  Here you can set variety of options. They work the same way as in the game.
  Fill in the name of the server
  Press “Save config and start” and you are ready to play
Setup as a service:
  Run SpaceEngineersDedicated.exe as Administrator
  Press the “Add new instance” button
  Fill in the name of the service (must be unique system-wide)
  Choose the service you just created from the list of server instances
  Setup your game the same way as with a foreground process
  Pay attention to ports in “Server settings”, as a single port can only be used by one server instance
User Interface
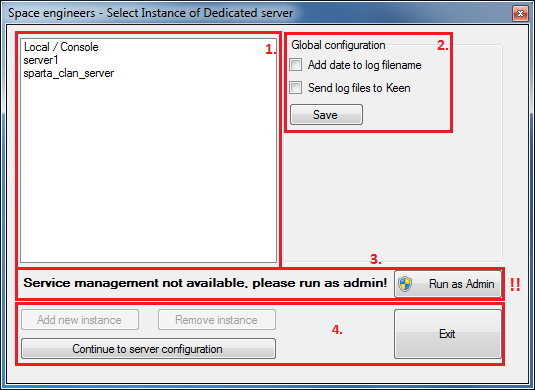
1. Server List
- Here you can see the list of the server instances. There’s always one instance named “Local/Console” and optionally several other instances with custom names.
- The “Local/Console” instance is run on foreground as a standard application and is always there, while the other instances that the user creates are run in the background as Windows services.
2. Global Configuration
- Here you can set, whether the game log files should have dates appended to them and whether the server should automatically send the log files to Keen Software House upon crash.
3. Service Management
- This message is shown when the application is not run with administrator right.
- If you want to create or manage the server as a service you need administrator rights. The button “Run as Admin” will restart the application with administrator rights.
4. Buttons
- "Add new instance"
- Creates a new instance of the dedicated server as a Windows service.
- "Remove instance"
- Continue to server configuration - Starts server instance configuration utility for the selected instances.
- "Continue to server configuration"
- Starts server instance configuration utility for the selected instances.
- "Exit"
- Closes the configuration utility
Server Configuration
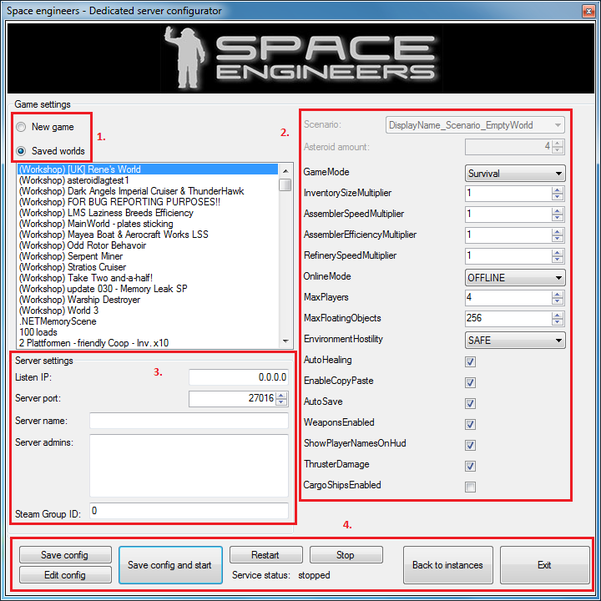
New game / Saved worlds option
- Lets you choose between starting a new world generated from a scenario or loading a previously saved world.
- The previously saved worlds are loaded either from the “AppData\Roaming\SpaceEngineersDedicated” folder in your home directory
- (e.g. “C:\Users\John.Doe”) or from the “ProgramData\SpaceEngineersDedicated” folder in the system root.
- To be able to play a world on the dedicated server that you previously created and saved in the game.
- you will have to copy it from your save game directory “AppData\Roaming\SpaceEngineers” to the respective folder.
Game settings
- Scenario - can only be chosen for the “New game” option
- Other settings work as you know them from the game with the added bonus that you can set the numerical options to any value you want.
- (Warning: Values out of the range allowed by the game user interface are not tested and officially unsupported. They can seriously affect the game experience and performance)
Server settings
- "Listen IP"
- Address of network interface that the server will listen on. This can be set to “0.0.0.0” (which is the default value) to listen on all interfaces, which should work fine in most cases
- "Server port"
- Number of the port that the server will listen on
- "Server name"
- Name that will be shown in the server list
- "Server admins"
Steam IDs (not nicknames) of the players with administrator privileges on the server (such as kicking and banning other players), each of them on a separate line (64bit SteamID)
- "Steam Group ID"
- If set to non-zero value, the dedicated server will only be visible for the given Steam group
Buttons
- "Save config"
- Saves the configuration for the current server instance
- "Edit config"
- Opens the current instance’s configuration file in a text editor for manual editing
- "Save config and start"
- Saves the current configuration and starts the server either as a foreground application or as a system service
- "Restart"
- (only for service instances) Restarts the server instance
- "Stop"
- (only for service instances) Stops the server instance
- "Back to instances"
- Returns to the screen with the list of server instances
- "Exit"
- Closes the configuration utility (but not the dedicated server, if it is running as a service)
Steam ID
Group ID
Servers can be restricted to Steam groups to better control access.
Servers that are unrestricted should show a groupID of 0 in the groupid field in the server configuration window
The group ID in the server configuration window references the GroupID64 not the Group ID on the profile page of your group. To properly fill out the group ID field you must obtain your group ID64. [1]
- Navigate to your steam community page, in steam or in a browser.
- If you navigated to it in steam, right click the page then select Copy Page URL and paste it into a browser.
- Append /memberslistxml/?xml=1 to your URL, If your group name is Example your url will look like this: http://steamcommunity.com/groups/example/memberslistxml/?xml=1 [1]
- On the page that opens up copy your GroupID64 from between the GroupID64 tags.
- Paste that number into the group ID field.
Command Line Tool
the following arguments can be used with SpaceEngineersDedicated.exe:
- “-console” - starts a server instance as an application
Router and Firewall Settings
All info taken from the Official Page
 This article is a
